Terminating an Employee in Namely Using the Termination Form
A guide to terminating employees in Namely using the Termination Form.
Note: This guide covers how to use the new Termination Form to terminate an employee. These updates are only available to a select group of Namely clients who have received early access. If you are not included in this group, please refrain from consulting this guide until the feature is released to all clients.
Whenever an employee leaves your company, whether voluntarily or involuntarily, they should be terminated using the Termination Form in Namely.
The Termination Form is a unified, easy-to-use form that automatically updates all information related to a worker’s employment, ensuring accurate employment records and removal from payroll and benefits (when applicable).
-
Please note: The Termination Form is the only way to terminate an employee in Namely. You cannot manually update the employee's termination date or use a custom workflow that includes the termination date.
Roles and Permissions
The Termination Form can be accessed by any user assigned to a role with the Can Terminate Profile permission.
The Can Terminate Profile permission can be scoped to apply only to certain employee populations (for example, you could scope the permission so a user can only terminate their direct reports or employees in their same department).
For more information on accessing and scoping user roles and permissions, Scoped Permissions
How to Use the Termination Form
To access the Termination Form, go to the employee’s profile and click Terminate.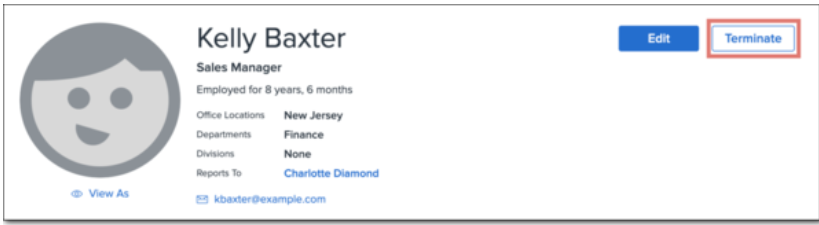
The fields that surface in Termination Form are dependent on the specific features you use in Namely (for example, Payroll or Benefits). If your organization does not use a particular Namely feature, fields related to that feature won’t display in the Termination Form.
TIP:
If you're terminating an hourly employee who tracks their hours on Namely Time, wait until their final paycheck has been processed prior to terminating the employee. Hours recorded during a pay period after the termination process has been initiated will not pull over from Namely Time.
To launch the termination process:
-
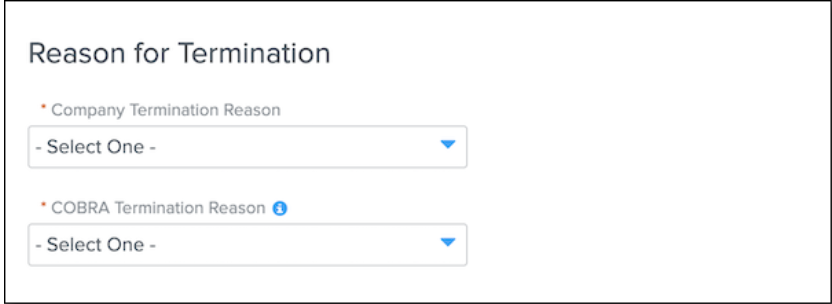
Select a Company Termination Reason.
-
These are the reasons your company has designated as possible causes for termination. They are configured under Company > Settings > Termination Reasons. For more information see Employee Data Settings: Termination Reasons.
-
-
Select a COBRA Termination Reason. (Benefits clients only)
-
These are government-defined causes of termination required for COBRA benefit assistance.
-
-
Enter a Termination Date.
-
This is the employee’s final day of employment.
-
-
Enter a Pay Through Date. (Payroll clients only)
-
This is the date after which the employee will no longer be included in pay cycles being processed. Must be greater than or equal to the Termination Date.
-
Note: If you are using Automated Salaried Proration – Released 2/27/2020 in Payroll, the Termination Date and Pay Through Date should match.
-

-
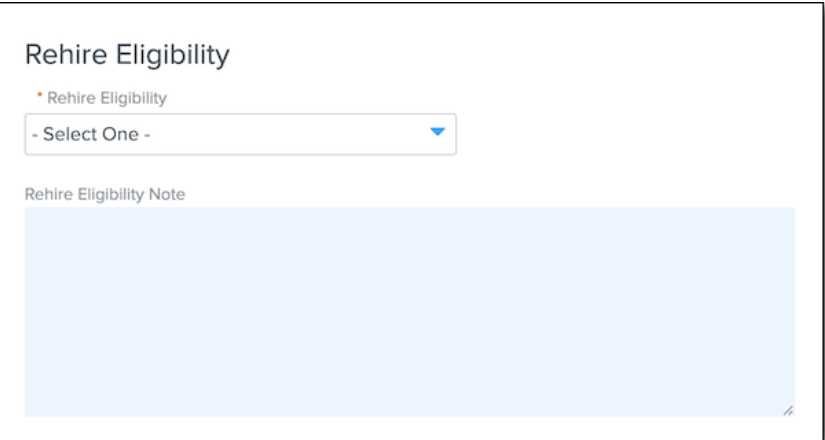
Select the employee’s Rehire Eligibility.
-
Note: It is not currently possible to report off rehire eligibility.
-
-
Enter any notes regarding the employee’s rehire eligibility. (Optional)
-
Select whether the employee’s benefits should be terminated. (Benefits clients only)
-
Checked by default, this field kicks off the benefits termination process. The date the employee loses coverage is determined by the rules set in the benefit plan settings.
-
If you have questions about plan eligibility rules or whether an employee’s benefits should be terminated, please contact your broker.
-
-
Select whether you want to deactivate the employee’s Namely account.
-
Removes access to the employee’s HCM account at 11:59 PM ET on their termination date.
-
Note: If the employee being terminated has payroll administrative access, their access is removed on the termination date.
-
-
Select whether you want to give the terminated employee future access to pay stubs and tax documents. (Payroll clients only)
-
Sends a link to the employee’s personal email address on their termination date providing access to past pay stubs and year-end tax documents.
-
-
Enter the employee’s personal email address. (Payroll clients only)
-
Used for emailing a link to access past pay stubs and year-end tax documents.
-
-
Click Terminate.

Note for multi-EIN clients: Using the Termination Form will terminate an employee from all payroll subsidiaries at your organization. To remove an employee from a single subsidiary, you must add an end-date to their pay group assignment. For more information, see How do I remove an employee who is paid via multiple payroll subsidiaries (EINs) from just one of those subsidiaries?
Termination Impact – What Happens After Submitting
Pending and New Workflow Instances
After you have completed all necessary fields in the Termination Form and clicked Terminate, a modal will appear asking you to confirm the termination and informing you that all of the employee’s in-progress workflow instances (custom workflows) that include fields in the Termination Form will be canceled on their effective dates.
Additionally, after submitting the termination, no new workflow instances containing fields that are also included in the Termination Form can be launched for that employee. Any workflow instance links on profile fields also included in the Termination Form will be disabled.
Automated End Dating and Deletion of Employee Records
When an employee’s termination is submitted, a number of records are automatically end-dated or deleted on the termination date and pay through dates.
At 11:59 PM ETC on the pay through date:
-
Any salary records (including wages and bonuses) will be automatically end-dated.
-
Any wage records assigned to the employee that have a start date after the employee’s termination date will be automatically deleted.
-
The Include in Payroll checkbox on the employee’s profile will automatically be deselected.
Note: If a pay through date is not designated (for example, because you do not use Namely for Payroll), the system will use the termination date for the above records.
For information about making changes to employee data after a termination has been launched, see Editing Employee Data During In-Progress Terminations.
For information about canceling a termination, see How to Cancel a Termination.